In spite of my engineering background, I’ve never considered myself to be a coder. In college, I took a few required programming courses in both Assembler and C++. Those two classes, while informative, were never my cup of tea. (I also took a Fortran class as a freshman, and let’s just say – my very first introduction to the subject of programming was a nightmare.)
I preferred solving Karnaugh maps and building analog amplifiers.
Although my engineering days are long behind me, I still carry the engineer’s mindset: fixing problems and using tools to improve my productivity. Automation scratches that engineering itch.
Up until recently, my instant go-to has been to purchase software tools to solve specific problems. There’s nothing wrong with that. It’s often easier and more efficient to buy a working solution than to make one from scratch.
With my new MacBook Pro (aka FrugalMac), and some time on my hands, I wanted to try my own hand at solving some productivity problems before resorting to a purchase. In other words, I wanted to make my own bespoke tools.
My first challenge was to create an automation that would automatically delete files in a specific folder after a specific interval of time. Whether I’m writing or teaching, I take a lot of screenshots. As such, these files accumulate inside my Screenshots folder. The same holds true for the resultant resized images that I use for posting content online.
To summarize, I wanted a script that would allow my Mac to:
1) Automatically delete images from the Screenshots folder after 3 days.
2) Delete images from the resized images folder after 7 days.
As a bonus, I wanted the script to be reusable, should I wish to perform similar tasks on other folders on my Mac. I wasn’t exactly sure how to go about this task, so I consulted with ChatGPT. It suggested I start by creating a shell script.
Part 1: Evaluating Files for Deletion
The shell script’s job is to examine the files within a specific folder and delete those that meet the specified condition. For reuse, the script would require three input parameters:
1) TARGET: The folder path. (i.e. where to evaluate files for deletion)
2) RETENTION_DAYS: The number of days to hold the file before deletion.
3) DRYRUN: a TRUE / FALSE toggle for testing the specified condition without deleting any files.
Because these values are passed into the script rather than hard-coded, the same script can be reused for any folder simply by supplying different parameters.
After iteration and testing, below is the resultant shell script (called cleanup-folder.sh):
#!/bin/zsh

# ============================================================
# cleanup-folder.sh
#
# Deletes files older than a specified number of days from
# one target folder.
#
# Subfolders are not scanned.
#
# Usage:
#
#   cleanup-folder.sh "/path/to/folder" retention_days dryrun
#
# Examples:
#
#   cleanup-folder.sh "$HOME/Screenshots" 3 false
#   cleanup-folder.sh "$HOME/Screenshots/resized images" 7 true
#
# Arguments:
#
#   $1  TARGET folder
#   $2  RETENTION_DAYS
#   $3  DRYRUN: true or false
#
# Important:
#
#   Files are permanently deleted. They are not moved to Trash.
# ============================================================

TARGET="$1"
RETENTION_DAYS="$2"
DRYRUN="${3:-false}"

############################################################
# Validate Inputs
############################################################

if [[ -z "$TARGET" ]]; then
    echo "Error: No target folder provided."
    exit 1
fi

if [[ -z "$RETENTION_DAYS" ]]; then
    echo "Error: No retention period provided."
    exit 1
fi

if [[ ! "$RETENTION_DAYS" =~ '^[0-9]+$' ]]; then
    echo "Error: Retention period must be a whole number."
    exit 1
fi

if [[ "$DRYRUN" != "true" && "$DRYRUN" != "false" ]]; then
    echo "Error: Dry-run setting must be true or false."
    exit 1
fi

if [[ ! -d "$TARGET" ]]; then
    echo "Error: Target folder does not exist:"
    echo "$TARGET"
    exit 1
fi

############################################################
# Convert Days to Minutes
#
# Using minutes avoids the unintuitive behavior of find's
# -mtime test, which counts completed 24-hour periods.
############################################################

RETENTION_MINUTES=$((RETENTION_DAYS * 24 * 60))

############################################################
# Process Files
#
# -mindepth 1 prevents find from evaluating the target folder.
# -maxdepth 1 prevents it from entering subfolders.
############################################################

if [[ "$DRYRUN" == "true" ]]; then
    echo "DRY RUN: Files older than $RETENTION_DAYS day(s) in:"
    echo "$TARGET"

    find "$TARGET" \
        -mindepth 1 \
        -maxdepth 1 \
        -type f \
        -mmin +"$RETENTION_MINUTES" \
        -print
else
    echo "Deleting files older than $RETENTION_DAYS day(s) in:"
    echo "$TARGET"

    find "$TARGET" \
        -mindepth 1 \
        -maxdepth 1 \
        -type f \
        -mmin +"$RETENTION_MINUTES" \
        -delete
fi
The script can be run from the Terminal:
~/Scripts/cleanup-folder.sh ~/Screenshots 3 false
In the example above, I’m telling the script to:
- examine the Screenshots folder,
- delete files older than 3 days, and
- actually perform the deletion (false)
For testing purposes, I can substitute true for the final argument, causing the script to simply list the files that would be deleted.
One interesting lesson I learned during development involved the find command. My original version relied on -mtime, which groups files into completed 24-hour periods. That produced some unintuitive results where files lingered longer than expected. I eventually switched to -mmin, converting days into minutes, which made the retention period much more precise.
I also modified the script so that it only processes files in the specified folder rather than descending into subfolders. That allowed me to assign different retention periods to my Screenshots folder and its resized images subfolder without the two interfering with each other.
One important note: the script permanently deletes matching files rather than moving them to the Trash. Since these folders only contain temporary working files, I was comfortable with that tradeoff.
Part 2: Scheduling the Task
After getting the script working properly with manual intervention, I was ready to automate it. Automating the script required two things: supplying the input parameters and telling macOS when to execute it. The shell script knows how to perform the cleanup, but it doesn’t know when to run. That’s where a LaunchAgent comes in. A LaunchAgent is defined by a small property list (.plist) file that tells macOS:
- what program to run
- what arguments to supply
- when to run it.
Using the Terminal, I created a file called com.krishna.cleanup-screenshots.plist and placed it into my $HOME/Library/LaunchAgents folder. Inside this file are the Program Arguments (containing the three inputs) and Calendar Interval (I want the script to run at 3AM every day).
<?xml version="1.0" encoding="UTF-8"?>
<!DOCTYPE plist PUBLIC "-//Apple//DTD PLIST 1.0//EN"
"http://www.apple.com/DTDs/PropertyList-1.0.dtd">

<plist version="1.0">
<dict>

    <key>Label</key>
    <string>com.krishna.cleanup-screenshots</string>

<key>ProgramArguments</key>
<array>
    <string>/bin/zsh</string>
    <string>/Users/kms/Scripts/cleanup-folder.sh</string>
    <string>/Users/kms/Screenshots</string>
    <string>3</string>
    <string>false</string>
</array>


<!-- Run once whenever the LaunchAgent is loaded -->
    <key>RunAtLoad</key>
    <true/>

    <!-- Run every six hours -->
    <key>StartInterval</key>
    <integer>21600</integer>
</dict>
</plist>
Originally, I scheduled the LaunchAgent to run every morning at 3:00 AM using StartCalendarInterval. During testing, however, I discovered that relying on a fixed time wasn’t ideal for my workflow. Instead, I updated the LaunchAgent to run whenever I log into my Mac (RunAtLoad) and then every six hours thereafter (StartInterval).
That change makes the automation far more resilient. Rather than depending on a specific time of day, the cleanup simply runs periodically in the background while I use my Mac.
Part 3: Letting the Mac Run the Task
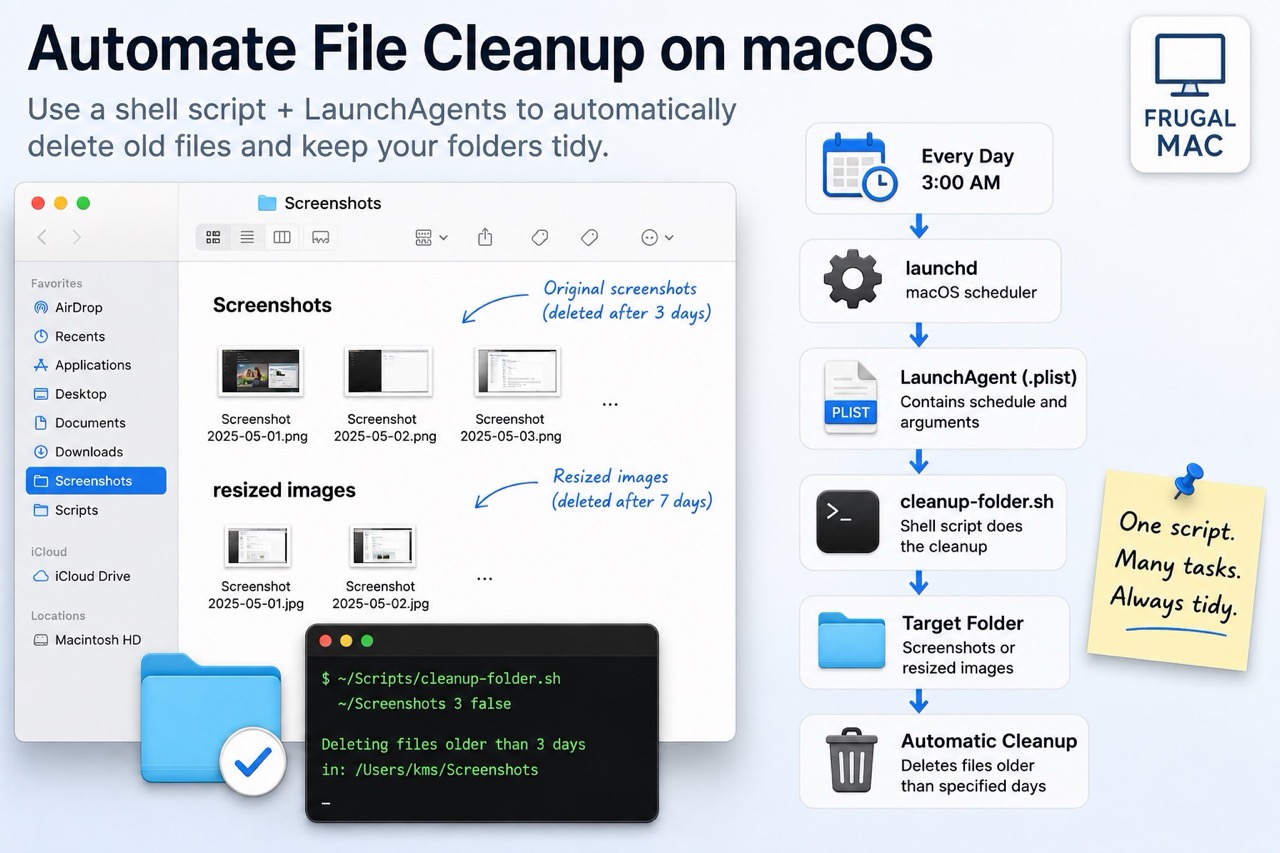
The Mac manages its tasks through launchd. As I understand it, here’s what happens:
At 3:00 AM each day, launchd loads the LaunchAgent defined by com.krishna.cleanup-screenshots.plist. The LaunchAgent then starts /bin/zsh, which executes cleanup-folder.sh using the arguments supplied in the plist. Or, put another way:
Login
   │
   ▼
launchd
   │
   ▼
LaunchAgent (.plist)
   │
passes folder path
passes retention period
passes dry-run setting
   │
   ▼
cleanup-folder.sh
   │
examines files
   │
   ▼
Deletes files older than
the specified retention period
I applied the same approach for my resized images folder. All I needed to do was create a separate .plist file (called com.krishna.cleanup-resized-images.plist) with its own custom arguments.
Screenshots -> retain for 3 days
resized images -> retain for 7 days
Both LaunchAgents use the exact same shell script.
Summary:
What I like most about this solution isn’t that it automatically deletes screenshots. It’s that the automation is modular. The shell script performs one job well, while each LaunchAgent provides the configuration for a specific task. If I later decide to automate cleanup for another folder, I don’t need to write another script. I simply create another LaunchAgent with a different folder path and retention period.
FrugalMac tip: This entire solution uses tools already included with macOS:
- zsh (shell)
- find
- launchd
- LaunchAgents (.plist files)
No third-party utilities are required.
Wouldn’t using a program like Hazel be easier? Yes. But would it be as satisfying for me? Definitely not.
-Krishna
I updated this article on 7/12 to reflect the fixes I incorporated, as well as improve overall clarity.