Starting Clean: My Photoshop Customizations in CS6
Below are the settings and customizations I immediately set up after a fresh install of Adobe Photoshop. Many of these workflow customizations save me huge amounts of time. Your mileage may vary, but maybe… just maybe… you’ll have found a trick or tip that will help you out.
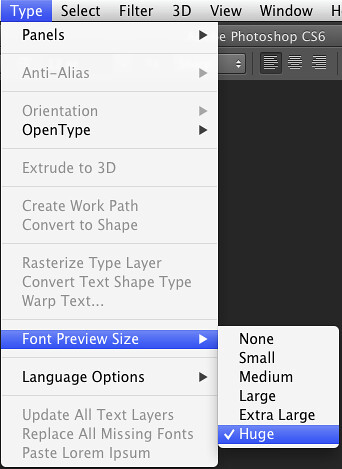
Default Font Preview Size
A trip to Type > Font Preview Size in the menubar will let you change the preview size of Type when that tool is active. I set mine to Huge to minimize eye strain.
Read on to see how I’ve mapped my keyboard shortcuts…
Keyboard Shortcuts
On the Mac, located under Edit > Keyboard Shortcuts. The first keyboard shortcut I almost always set is Undo. In Photoshop, Command-Z only goes back one step. Step Backward lets you go back multiple steps, but it’s three keys that you have to mash Opt-Command-Z. To make the Undo command behave like I want, I map Step Backward to Command-Z and Undo to Opt-Command-Z.

I also have Save for Web mapped to Control-Command-S. Other keyboard shortcuts I regularly use:
Opt-F5: Stroke

Opt-F6: Gaussian Blur

Command-F6: Pixelate Color Halftone
Menu Color Coding and Visibility
Why clutter your pull-down menus with commands you’ll never use? Visit Edit > Menus and you can toggle the visibility of any pull-down menu item. You can also assign custom colors for pull-down menu options to make them easier to find in your day to day usage. In the photo below, I have some of my favorite menu items highlighted in Green.

Once you’ve customized both your Keyboard Shortcuts and Menu, you can save them out as files by clicking the left-most hard drive icon, which is located to the right of the Set pulldown menu (currently grayed out in the screenshot below).

Layers Palette
Clicking the small black triangle with four lines next to it in the upper right-hand corner of the Layer’s panel will bring up the options below:

Click Panel Options… and change the thumbnail size to Large. To better view the contents within your layers, select Layer Bounds.

Preferences
Here are the settings I use for the Interface section of my Photoshop preferences. I hate the tabbed docking of files, because 90% of the time I want to be able to see two files side-by-side. Uncheck “Open Documents as Tabs” and the next time you open PS, each project window will open separately in their own floating windows.

Photoshop thumbnails, while useful, take up a considerable amount of time to write when saving your file. So I turn off Image Previews. To keep PS from prompting you to verify PSD and PSB file compatibility each time you save a file, select “Always” in the Maximize PSD and PSB File Compatibility pull down.

I generally work with pixel based files no larger than 3000 px wide, with many layers. Adobe recommends a lower cache level (I went with 2). I have my Cache Tile Size set to 1024K. The larger the cache size, the larger amount of data Photoshop can store or process at once.

Under Transparency and Gamut in the Photoshop preferences, I’ve set my grid size to Large and Grid Colors to a darker gray. Darker gray makes it easier for me to see color against the transparency.

For my guides, I’ve set mine to dashed lines to make them easier to distinguish in my project file.

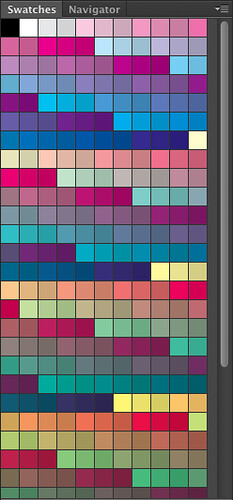
The Swatch Palette
In the upper right-hand corner of the Swatches palette, lives the settings that control how your color swatches are displayed. I prefer large thumbnails because it makes them easier to select. (I also use my own custom color swatch palette instead of the defaults provided by Adobe.)
Tool Presets
If you find yourself constantly using specific brushes from the brush palette, or if you have your own custom brushes that you want to access quickly, save your brushes into the Tool Presets panel. Here are a few of mine:

Don’t forget to save out your Tool Presets!
The Crop Tool
If you’re bummed out at the way Photoshop handles cropping in CS6, you can revert it back to the original way by first selecting the Crop Tool (in the Toolbar, or keyboard shortcut C) and then clicking on the “star” that appears on the Options bar. Select Use Classic Mode and your Crop Tool will behave the way it always has.

So, that’s it for the most part. If you’ve found these settings to be practical for your PS workflow, please drop me a note or share the love. Share your PS customizations in the comments below – I’m always looking for better ways to make the most out of my favorite tool.
Thanks!
-Krishna
Tell me what you think!


No comments yet. Be the first!