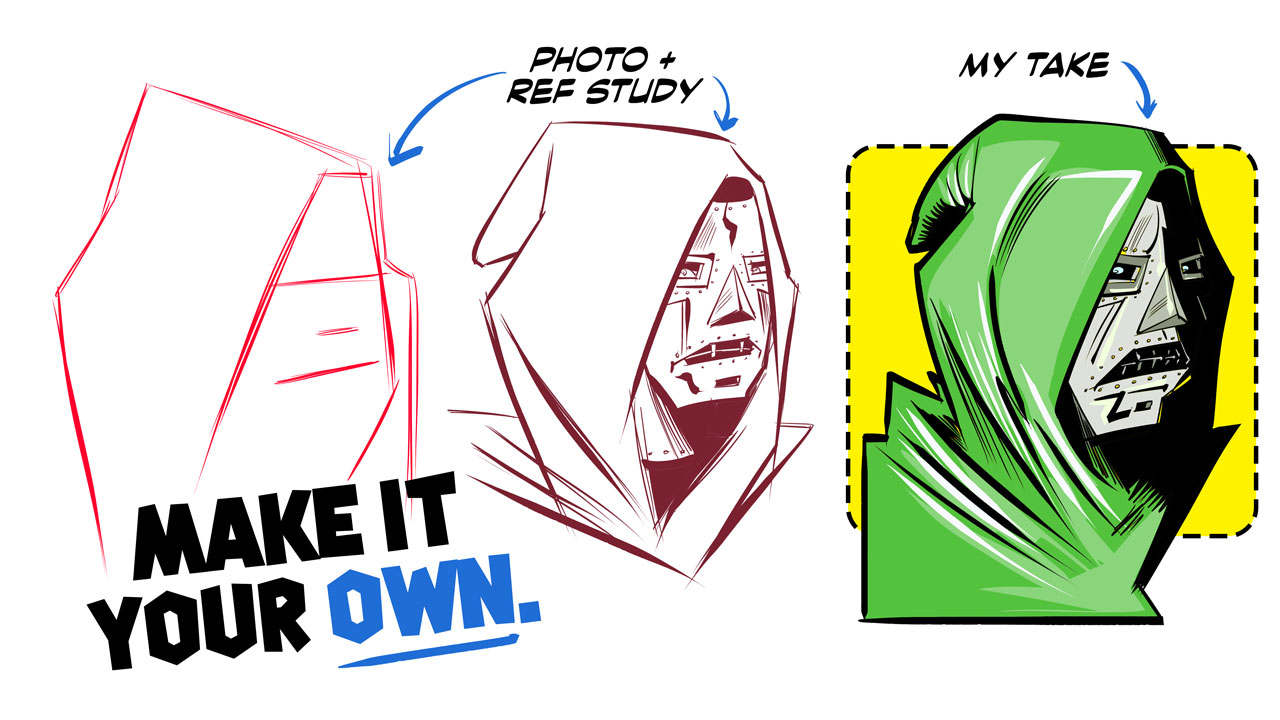
My latest video focuses on a few techniques I employ when drawing popular characters, using a combination of photos and reference illustration to map the character onto a different pose. To demonstrate the process, I selected an image of Dr. Doom, drawn by Jack Kirby, and an unrelated photo of a cloaked figure, facing a different direction.
From the Archives features select blog posts that I recovered from the original PCW website. Every effort has been made to preserve the original article as is. Some minor updates are included, as needed.
originally published: March 30, 2020
(Lengthy blog post. Sit back and bring your favorite beverage…)
Based on the last several blog posts, it should be obvious that I’ve been bitten by the bug that is retro-computing. I had so much fun resurrecting my Mac SE FDHD that I wanted a new challenge.
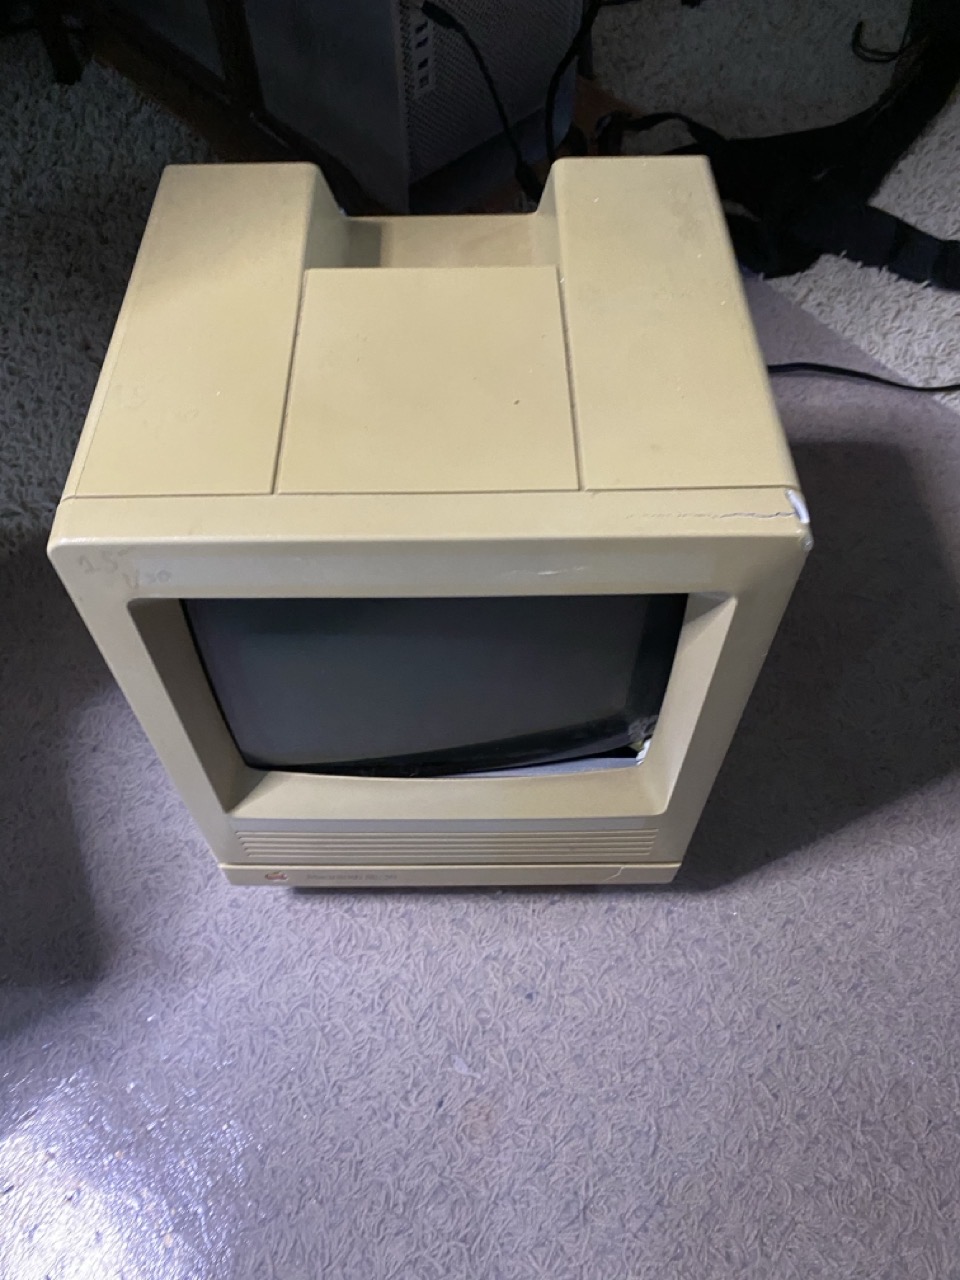
Several months ago, I bid and won a Mac SE/30 on eBay. From the seller’s own photos, the Mac was listed as “sold as is”. From the seller’s photos, the case was yellowed, but intact. The machine did not boot, but displayed the infamous Simasimac screen. After assurances from the seller that he would properly pack the machine before shipping it, I placed my bid and won the Mac for a whopping $60US + shipping.
I felt confident that I could bring this venerable Mac back to life…
When buying vintage computers on eBay, it’s always a roll of the dice. The seller did not disclose much information outside of the four photos accompanying his post. I placed my trust in what he listed. After all, the seller had a 100% positive rating on eBay.
What could go wrong?
A lot, it turns out.
A few days after I won the bid, a box showed up at my doorstep. It was no bigger than the Mac SE/30 itself. My first thought was “I hope the Mac is okay.”
I brought the box inside and opened it up. The first thing that hit me was the pungent aroma of a fishy smell. Then I looked at the packaging: One thin layer of bubble wrap. Lifting the Mac out of the box, I could see granules of sand pouring out from its base. I had flashbacks to the final scene in “Raiders of the Lost Ark”, where the Nazis open the Ark of the Covenant.
It didn’t look so good. There were prominent cracks on the front bezel. One crack was by the floppy drive, while the larger one was on the top right corner of the front bezel. My heart sunk.
Immediately, I reached out to the seller. After some back and forth – he reluctantly refunded me for the entire amount that I paid. He didn’t want the Mac back, so I was now left with a nonfunctioning, dilapidated Mac SE/30.
Opening up the Mac with my Torx screw driver, I uncovered even more tragedy. The Mac SE/30’s RF shielding was eaten away.
My worst suspicions were confirmed when I pulled out the logic board…
The CMOS battery had exploded, taking out a corner of the SE/30’s logic board. I say “exploded” because of the massive corrosion ring splattered on the Mac’s chassis.
The “sand” was not sand, but rather – it was remnants of an exploded Maxell CMOS battery. Sadly, exploded batteries are fairly common for vintage Macs. Many people don’t realize the extent of the damage until they open up the case.
How did the rest of the Mac fare?
The back case appeared fine. I got a small chuckle out of the AppleCare sticker on it.
Apparently the Mac was last serviced on March 27, 1996. (I’m willing to bet at that last servicing, the battery was not replaced.)
The bottom (not pictured) was missing two of its rubber feet. The Mac was heavily yellowed, with a few minor marks on its sides.
The inside components of the Mac were the big unknown. Straight away, I could see the damage on one of the CRT mounts on the front bezel. The CRT had been pushed in, most likely in transit.
The CRT picture tube itself looked intact, which was a relief. I had no idea if any of the other components worked, but aside from the dust – they seemed ok.
Time to roll up my sleeves and get to work…
The first order of business was to remove all the components from the chassis.
Taking the front bezel off wasn’t too difficult. Sadly, it was too far gone for repair. When removing the CRT – the bezel’s mounts crumbled apart. Before tossing the front bezel out, I extracted the speaker and Apple logo from it. I used an Exacto knife to remove the four small plastic stubs that held the speaker. For the Apple logo, I used a small thin paper clip on the inside of the chassis to pop the Apple logo out.
I needed a new front bezel. Instead of hunting online for the possibility of finding a donor Mac, I opted to go with the MacEffect’s clear front bezel. These are in very limited supply, as they were produced for Kickstarter backers last year. I was fortunate that the owner of MacEffects had a spare front bezel for sale, so I scooped it up. Within a few days of ordering it, the new front bezel arrived. The test fit was perfect!
I turned my attention towards de-yellowing the back case. This time around, I wasn’t as successful. The back case displayed some mild streaking, even after 3 rounds of retrobriting. I decided to live with it.
I attempted to repair the logic board (in vain). I replaced some of the logic, diodes and capacitors that were most affected from the corrosion. But there are many traces that were fully eaten away. Sadly, repairing the logic board is beyond my repair skills.
Like the logic board, the chassis was another basket case. Or so I thought…
The floppy drive cage was also pretty badly corroded.
Removing corrosion was actually not too difficult, thanks to Apple Cider vinegar. I filled up an empty bucket with the vinegar and submerged the floppy drive cage and chassis.
Within 24 hours, a good percentage of the corrosion disappeared.
After two treatments of vinegar submersion, the chassis and drive cage were looking significantly better.
Next,I used Barkeep’s Friend to remove the remaining corrosion, by spraying the chemical on the chassis and floppy drive cage. The results were pretty impressive. Pro tip: do this type of work in a well ventilated area (preferably outside). You do not want to breathe in those fumes.
With 97% of the corrosion, it was time to use some Rustoleum gray primer to make the chassis and floppy drive cage more aesthetically pleasing.
After applying two coats of primer, I used Rustoleum’s Clear Coat to protect the paint from further rust and corrosion. The chassis and drive cage were looking infinitely better now!
While waiting for the clear coat to dry, I turned my attention towards the high density floppy drive. Unsurprisingly, the unit was caked in dust and non-functional. I took the whole unit apart and thoroughly cleaned and lubricated each component. I also replaced the crusty auto eject gear with a 3D printed replacement.
I also took some time to clean the CRT and CRT yoke, using a combination of Clorox Wipes, 70% isopropyl alcohol and a tooth brush. With all the main components cleaned, it was now time to reassemble all the components. I’ll let the photos speak for themselves.
It looks good, but does it work? For that, I employed the service of my Mac SE FDHD’s logic board. SE logic boards work and fit perfectly inside an SE/30. With the logic board in place inside the Mac SE/30 case, I plugged the Mac into the wall and yelled “Fire in the Hole!”.
The Mac greeted me with its familiar chime. But there was no picture! Adjusting the brightness knob brought the familiar gray and white display to life. I’m pleased to report that the power supply, analog board, and CRT all work. There is some minor ghosting on the top of the CRT, but given where I started this project from – I was pleased that it still worked!
The floppy drive took some coaxing. It read and wrote to disks with no issue but struggled when attempting to eject a disk. I gave it the assist using a pair of my tweezers. After a few struggling attempts, the drive’s fresh lubrication took over and it was finally able to eject floppies all by itself.
The main casualties from this project were the logic board, the front bezel and the original Quantum drive that came with the unit. (To be honest, I did not expect the original platter based drive to work and would have been surprised if it did.)
Since this photo was taken, I have procured a replacement RF shield for the dilapidated Mac SE/30 (I’ve named it “Louie”). I’ve returned the SE FDHD logic board back to its original Mac (named Dewey). The only thing Louie needs now is a new logic board.
Paletro brings fast, keyboard-based search to your macOS Menu items. Using a custom assigned keyboard shortcut (initially set to Command-Shift-P), I can easily search and traverse menus for the app I’m currently working in.
Using Paletro has changed my Mac productivity ten-fold, because my hands never have to leave my keyboard to use it. It’s particularly handy for apps that have sprawling menu items, like Photoshop.
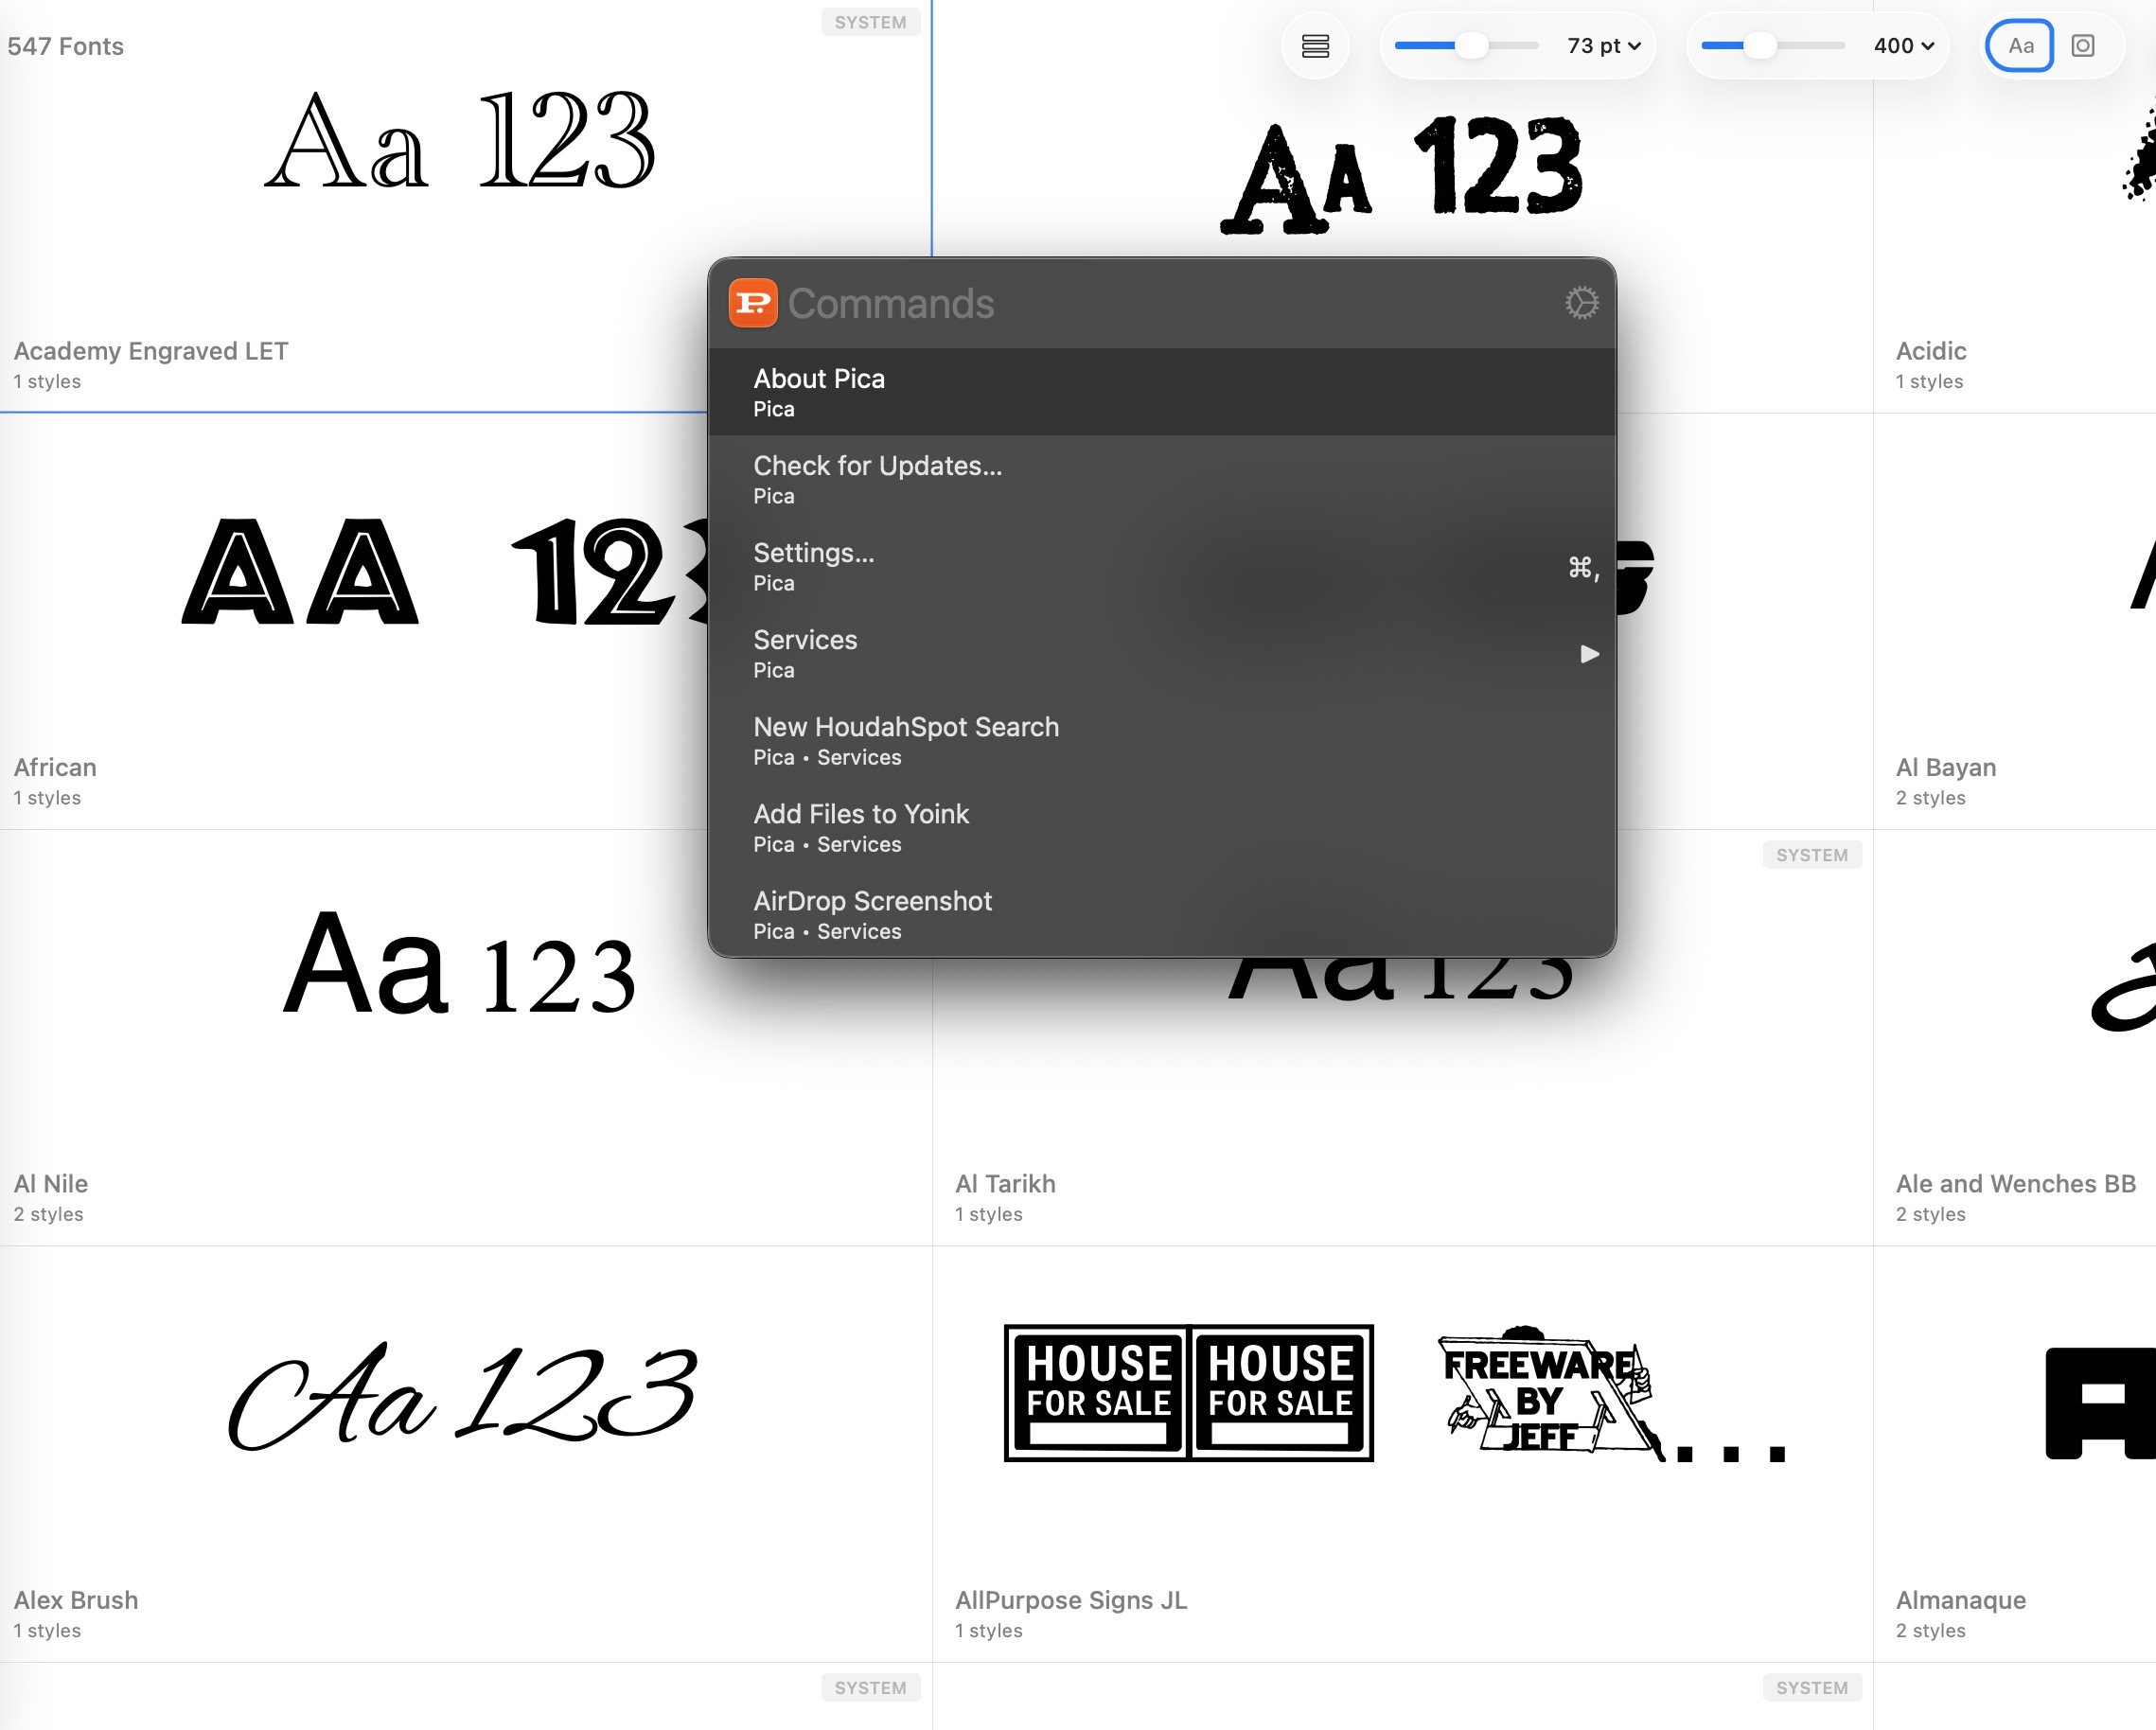
Pica is a new font manager for macOS. With it, you can easily view, categorize, and preview your Mac’s collection of typefaces. I’ve spent a day playing with it and wanted to share my first impressions.
First, Pica is fast!
It takes full advantage of all the benefits that come with being natively written for the Mac. (This isn’t some janky Electron app.) Even the installation process is filled with whimsy and delight. Notice the beautiful attention to detail in the Installer below.
After installing Pica, you’ll be treated to series of falling typefaces that fill up your Mac’s screen. Unexpected, but delightful!
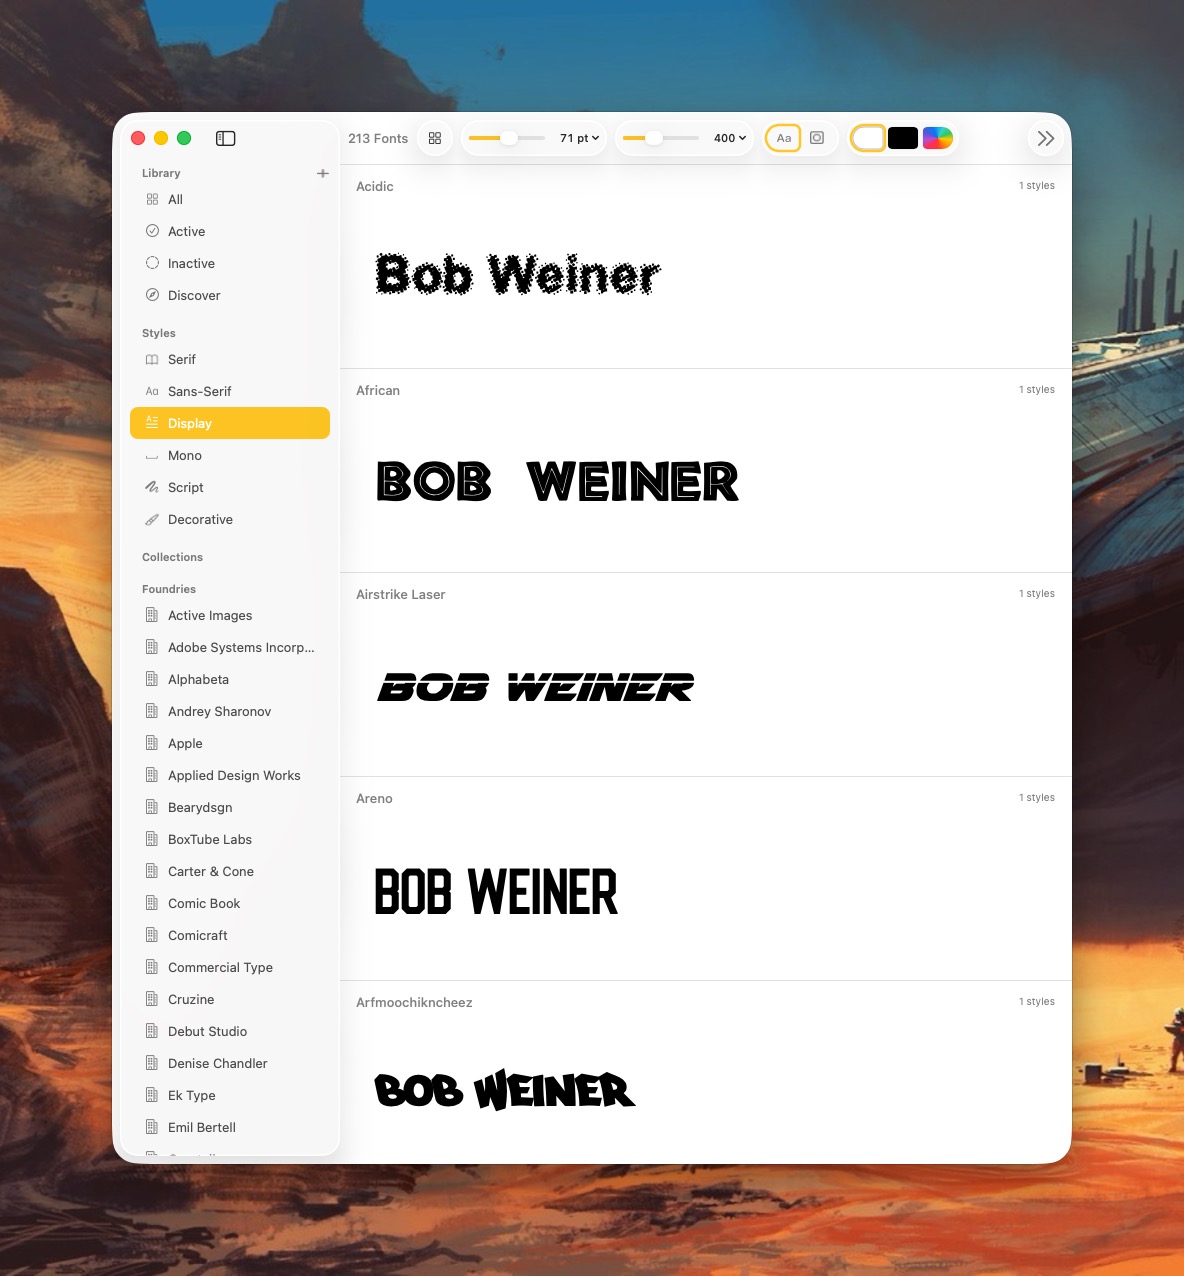
Pica lets me organize my typefaces the way I want; I can group typefaces into Serif, Sans-Serif, Display, Mono, Script or Decorative categories.
Pica offers several thoughtful customization options for viewing fonts. For example, I can view a typeface in black, white, or as any other HEX color value. This is great for designers!
I can also quickly change the background color of the app to see how it works with the typeface. With Pica, I can see what a green typeface looks like placed in front of a yellow background. (It’s not so great, as it turns out.)
Pica offers full OpenType support, one-click font activation and something called Watch Folders.
Here’s how it works: Select a folder for Pica to “watch”, and each time the folder gets a new font update, Pica will display it. Translation:Pica lets me view typefaces that are not actively loaded onto my Mac.
Why use Pica when macOS already comes with Font Book?
In a word: customizability. Pica not only lets me preview custom text across every typeface I have on my Mac, it lets me quickly adjust font size and font weight independently via two top-located sliders. Typefaces can be viewed as a grid or stacked vertically.
Font Book, by comparison, is pretty basic.
Pica extends beyond the fonts you have locally on your Mac. Click the “Discover” option and you’ll be treated to bold and unique typefaces created by some of the world’s best font foundries.
Pica is a native Mac application, which means it takes full advantage of macOS’s underlying architecture. Best of all, it’s free.
If you spend considerable time working with fonts on your Mac, Pica’s a no-brainer download.
Let’s talk about macOS File Sharing, an option I use almost daily. On macOS, File Sharing lives under:
System Settings → General → Sharing → File Sharing
That method works fine if you only need to toggle it occasionally. But I need File Sharing ON when I bring my laptop home, and OFF when I’m about to take it with me when I leave for work. Visiting the System Settings each time to toggle File Sharing was getting tiresome.
So I decided to do something about it.
Below is a custom Alfred Workflow I made called File Sharing Toggle that I’ve tested on both Macs at home.
My Alfred Workflow has three options:
Turn File Sharing ON
Turn File Sharing OFF
Check File Sharing Status
The ON/OFF actions toggle File Sharing appropriately and displays a dialog box showing the current File Sharing state. A separate Status action displays a dialog box showing the result of a query on the current File Sharing state.
My workflow uses macOS shell commands and will ask for your administrator password when turning File Sharing on or off. (It’s a small price to pay for the convenience.)
Step 1: Create a New Alfred Workflow
Open:
Alfred Preferences → Workflows
Click the + button and choose:
Blank Workflow
Name it something like:
Toggle File Sharing
Step 2: Add a Keyword Trigger
Right-click in the workflow canvas and choose:
Inputs → Keyword
Use these settings:
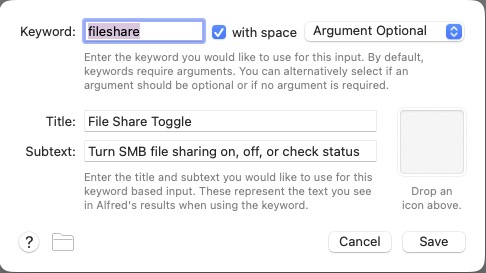
Keyword: fileshare
Title: File Sharing Toggle
Subtext: Turn SMB File Sharing on, off, or check status
Argument: Argument Optional
Screenshot
Click Save.
Step 3: Add a List Filter
Right-click the canvas and choose:
Inputs → List Filter
Connect the Keyword object to the List Filter.
Set the Keyword to fileshare and Argument Required. Then add these three list items.
Item 1
Title: Turn File Sharing ON
Arg: on
Item 2
Title: Turn File Sharing OFF
Arg: off
Item 3
Title: Check File Sharing Status
Arg: status
Screenshot
Click Save.
Step 4: Add a Run Script Action
Right-click the canvas and choose:
Actions → Run Script
Connect the List Filter to the Run Script action.
Use these settings:
Language: /bin/zsh
with input as: argv
Paste this script:
#!/bin/zsh

ACTION="$1"
MESSAGE=""

case "$ACTION" in
  on)
    osascript -e 'do shell script "launchctl enable system/com.apple.smbd; launchctl bootstrap system /System/Library/LaunchDaemons/com.apple.smbd.plist 2>/dev/null" with administrator privileges'
    MESSAGE="File Sharing turned ON"
    osascript -e "display notification \"$MESSAGE\" with title \"File Sharing\""
    ;;

  off)
    osascript -e 'do shell script "launchctl disable system/com.apple.smbd; launchctl bootout system /System/Library/LaunchDaemons/com.apple.smbd.plist 2>/dev/null" with administrator privileges'
    MESSAGE="File Sharing turned OFF"
    osascript -e "display notification \"$MESSAGE\" with title \"File Sharing\""
    ;;

  status)
    if /usr/bin/pgrep smbd >/dev/null 2>&1; then
      MESSAGE="File Sharing is ON"
    else
      MESSAGE="File Sharing is OFF"
    fi
    osascript -e "display dialog \"$MESSAGE\" buttons {\"OK\"} default button \"OK\" with title \"File Sharing\""
    ;;

  *)
    MESSAGE="Unknown action: $ACTION"
    osascript -e "display dialog \"$MESSAGE\" buttons {\"OK\"} default button \"OK\" with title \"File Sharing\""
    ;;
esac

echo "$MESSAGE"
Click Save.
Your final Alfred Workflow Object Chain should look like this:
Step 5: Test the Workflow
Bring up Alfred and type:
fileshare
You should see three options:
Turn File Sharing ON
Turn File Sharing OFF
Check File Sharing Status
Select Turn File Sharing ON. macOS will prompt for your administrator password, and you should see a notification:
File Sharing turned ON
Select Turn File Sharing OFF to disable it, and choose Check File Sharing Status to see a dialog with the current state.
Status Dialogs
Switching File Sharing states (ON/OFF) will show a dialog indicating the updated state. Checking File Sharing status will show the current File Sharing state.
How the Script Works
The workflow interacts with the macOS SMB service:
com.apple.smbd
To enable File Sharing:
launchctl enable system/com.apple.smbd
launchctl bootstrap system /System/Library/LaunchDaemons/com.apple.smbd.plist
To disable it:
launchctl disable system/com.apple.smbd
launchctl bootout system /System/Library/LaunchDaemons/com.apple.smbd.plist
Status is determined by checking if the SMB daemon is running:
/usr/bin/pgrep smbd
Final Result
Toggle file sharing on with a simple Alfred command.
Now you can type fileshare on in Alfred to quickly toggle File Sharing ON. Similarly fileshare off turns File Sharing OFF. And fileshare status will check its current state— no need to root around inside System Settings.
(I did use AI to help me in writing the shell script.)
From time to time, I lurk on the r/macbookpro reddit group. Chief among the main worries of new MacBook Pro owners are battery life and battery cycles. These folks seem extraordinarily concerned about the battery cycle count, to the point of anxiety.
To them, I would say:
Batteries are a consumable item – they will degrade over time. Don’t worry about battery cycles or charging. Just relax and use your MacBook Pro as you normally would.
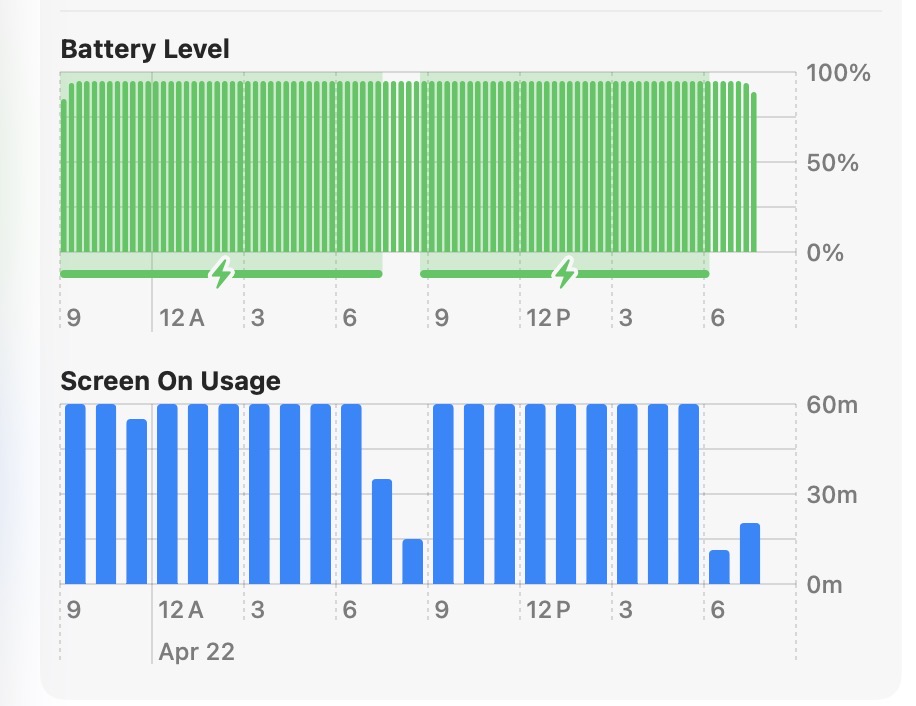
If you want to optimize your battery’s health, macOS Tahoe provides a new option to set your battery’s charge limit. I have mine set to charge up to 95% of the full charge limit. But, truthfully, I never even remotely cared about charge limit before.
After five years of extensive use, my M1 Pro MacBook Pro has 81% charging capacity. The battery’s cycle count is 115, and its condition is reported as normal.
While my MacBook Pro remains plugged in 80% of the time, I’m not afraid to run the MBP on battery juice when I’m out and about. It’s not uncommon for me to run my Mac’s battery completely down to the point where I have to plug it in. When it happens, I don’t worry about it. (The battery still lasts about 4 to 5 hours on one charge. Pretty impressive for a five year old laptop, all things considered.)
Bottom line: Don’t worry about your Mac’s battery cycle count. Just use it like you normally would.
My launcher of choice is Alfred, which I use for a variety of tasks: launching apps, file navigation, running terminal commands,searching the web, etc. As a power user, it’s efficient (and, dare I say, liberating) to perform these operations entirely from the keyboard.
Alfred’s power comes in the form of its extensibility, thanks to the (optional) Alfred Powerpack. Think of the Powerpack as a turbo-charger that integrates seamlessly with Alfred’s main engine. I’ve used Alfred for almost a decade; I can’t imagine sitting at a Mac that doesn’t have it.
So if Alfred’s the cat’s meow, why use Raycast?
Simply put: window management.
Raycast includes several useful window management configurations; each can be assigned a customized hotkey.
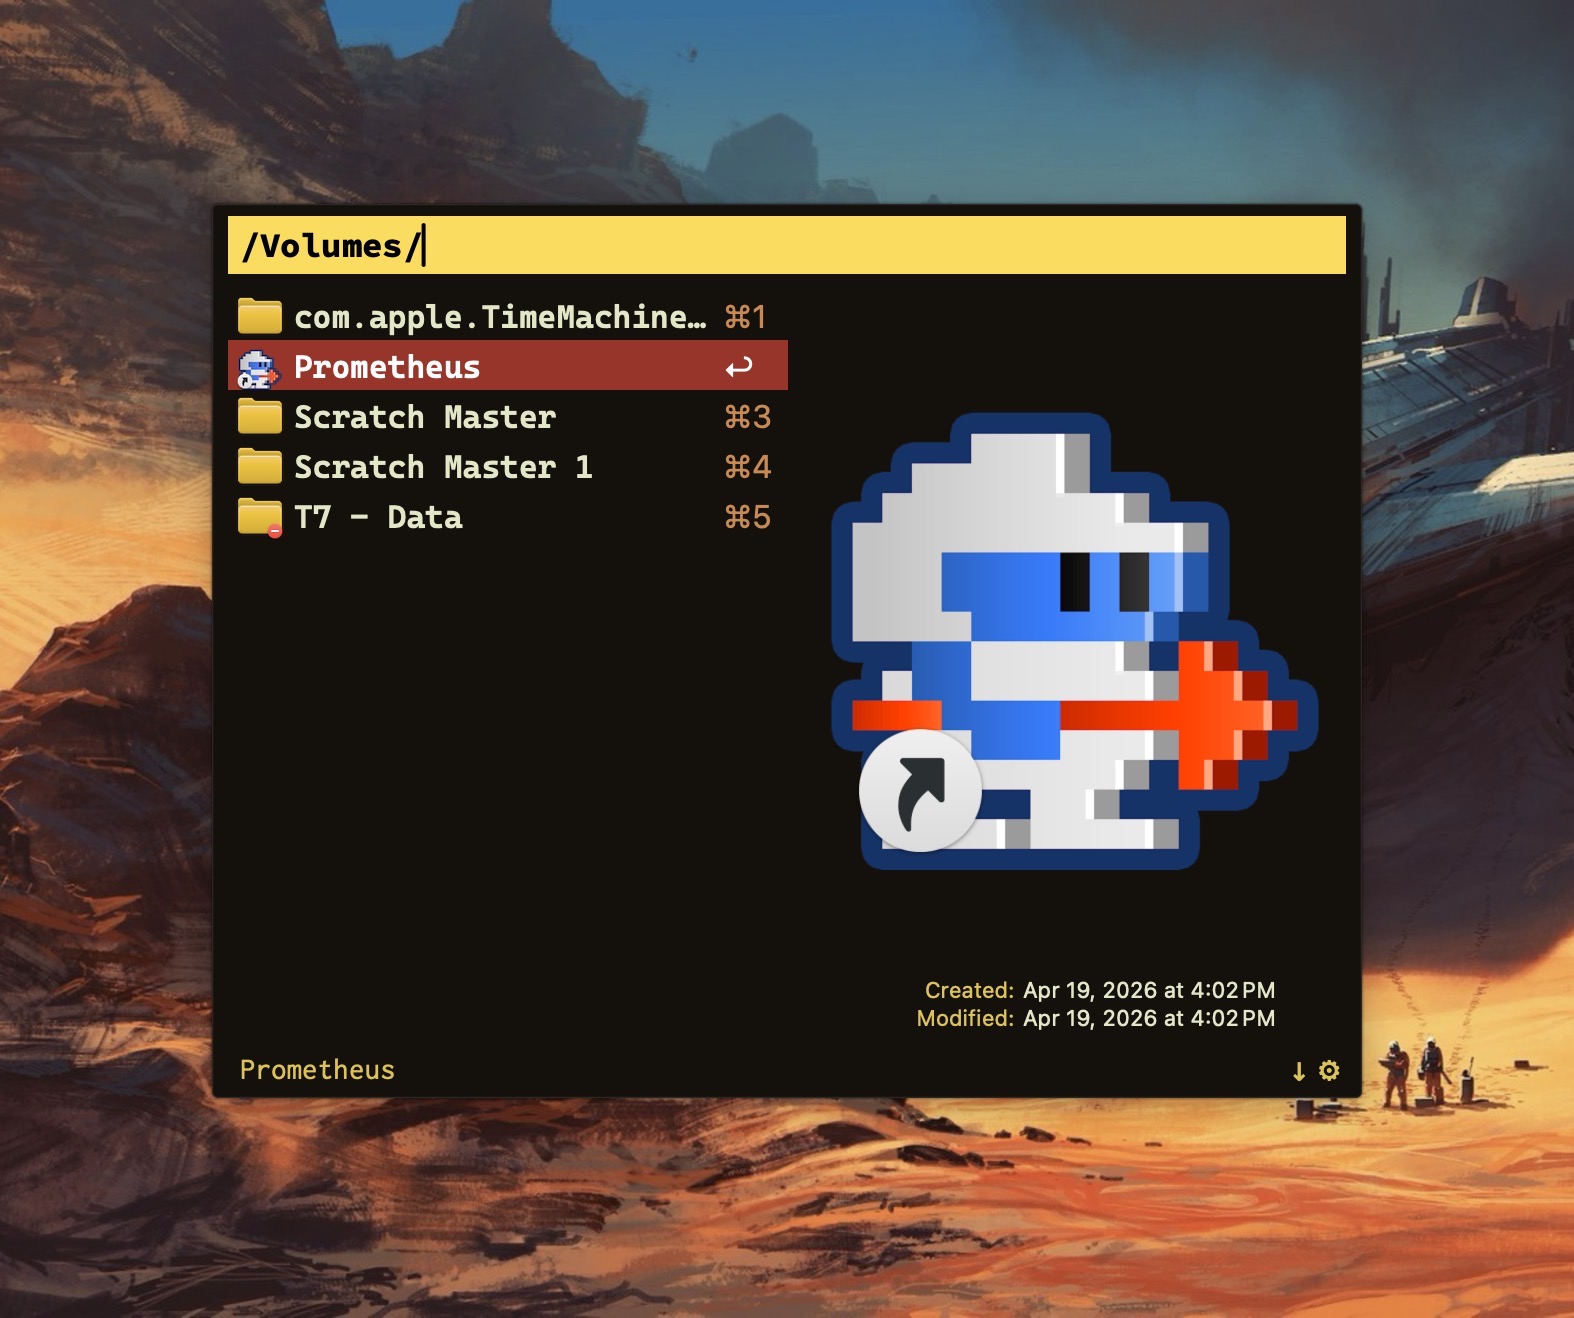
Why not switch from Alfred to Raycast then? Raycast lacks the ability to traverse my Finder files in the same way that Alfred does.
For visualization purposes, I’ve mapped my custom window management hotkeys to a numeric keypad (see below). They also work fine when used with a standard keyboard.
In my Raycast configuration, pressing Option-1 moves the active window to take up the left half of my Mac’s display. Option-3 moves the active window to the right half. I use these two hotkeys the most, so they are configured for easy reach. (I use keyboards with built-in numeric keypads.)
In my view, hotkey assignments are only useful if they’re memorable. The quadrant hotkeys are easy to remember because they are spatially correlated. On a numeric keypad, 4 is in the lower left, 7 is on the upper left, 6 is on the lower right, and 9 is on the upper right.
I use multiple displays with my MacBook Pro, both at home and at work. To move an active window to the screen on my left, I press Option-2. Pressing this keystroke successively will cycle the window counterclockwise across each of my three displays. Likewise, pressing Option-8 will move an active window to the screen on my right. Option-5 (not shown above) puts the active window in the center.
I’ve gotten so accustomed to using my keyboard to move windows around my Mac that manually selecting and sizing an active window with my mouse feels downright barbaric.
Alfred is free. The Alfred Powerpack is a paid upgrade (well worth it, in my opinion.) Raycast has free and pro versions, but the free version meets my needs.
If you find yourself needing more than what Spotlight gives, you have options.
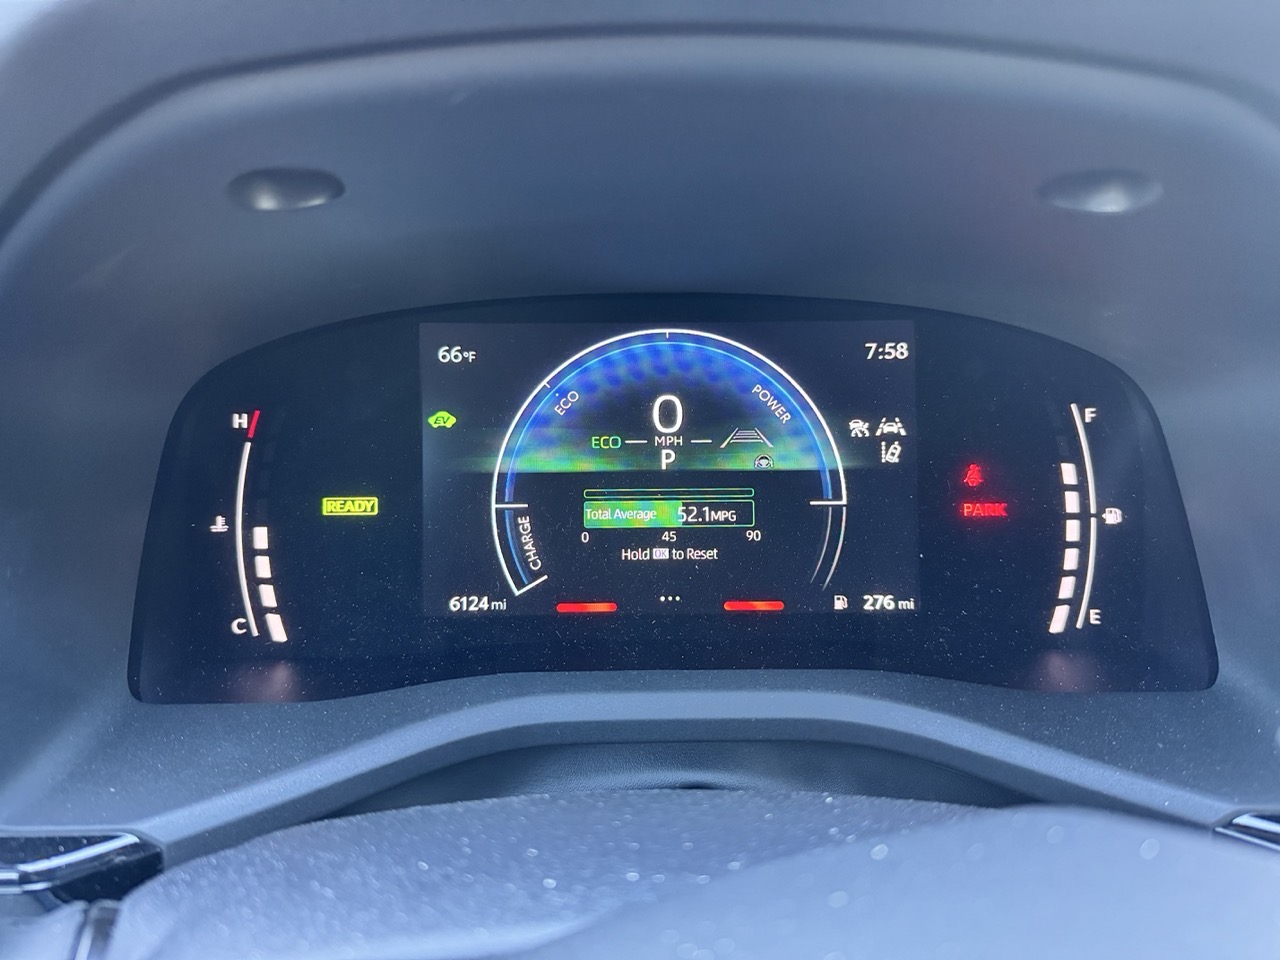
Look carefully at the image above. It’s from the dashboard of a 2025 Toyota Camry. Littered across the cluster are a cacophony of icons, measurement gauges and more. It’s a mess. Sure, the speedometer, engine temperature and gas guage are useful – but even within a few of those elements, there’s a lot going on.
As I drove last week, my car’s dash made a sound. An audible “ding”, quite similar to a smartphone chat notification. I’ve heard this ding appear before, at seemingly random times while on my commute. I have no idea what this “ding” signifies. Not one clue.
Maybe the “ding” coincided with a visual cue on my dash? I’ll never know. Because the dash cluster has little in the way of hierarchy. Because I’m too focused on driving to glance down to decipher what’s seeking my attention. Or maybe it’s just bad UI/UX.
And don’t even get me started on the Camry’s propensity to randomly drop its Bluetooth connection to my smartphone.
Modern car instrumentation is a minefield of distraction. Give me old fashioned analog buttons, gauges and knobs any day.
How did we get here? Why is modern car UI so darn awful?
Now that I’m back to regularly blogging once again, I wanted to document the software tools I use, along with my rationale for their use. My blogging chain is Mac-based, and each of the apps listed below are exclusive to this platform.
MarsEdit, by Red Sweater Software, is my preferred tool for writing and publishing posts. Having local back-ups for each and every post is very important to me. MarsEdit offers this feature, and much, much more. The biggest benefit to using the program is that I can draft new posts locally on my Mac, without the need to login to WordPress.
Every post on this site, with the exception of the first three articles, have been written using MarsEdit. MarsEdit removes the friction associated with posting to WordPress, making the process of drafting new posts something I actually look forward to.
Transmit, from Panic Software, is a powerful and elegant FTP application for the Mac. I’ve used Transmit for three decades now, starting with its first version, released on classic MacOS. It’s fast and intuitive, making working between local files and servers a breeze. I also use it to quickly shuttle files between my Mac and my Linux boxen on my local network.
Reading is just as important as writing. For keeping up with my favorite blogs, I use NetNewsWire, an open source RSS reader for the Mac (and iOS). I have this application running on both Macs and my iPhone. I use iCloud to keep my RSS feeds in sync, so I can always pick up where I left off, regardless of what device I’m using. NetNewsWire is free, fast, and intuitive (do you see a pattern here?).
I also use a custom action to convert HEIC images shared from my iPhone to smaller sized JPEG files I can use with my posts.
This week on my YouTube channel, I share a technique to help drawing practitioners improve their understanding of form, specifically focusing on organic, asymmetrical structures (i.e. trees, teeth, etc.).
This technique is universally applicable, whether your medium of choice is a tablet or a sheet of paper. I hope you find value in it.